Compass Assembly Tutorial

I receive many questions from students about the assembly of the 975 VK Compass, which is the compass I offer for sale in classes. I prefer this compass because it is affordable compared to other compasses and offers several features that make for easy drafting. It has an extender bar which allows you to draw circles up to 24″ in diameter, and it also has a pencil holder which will hold a mechanical pencil or a pen.
My favorite pencil to use with this compass is the Bic Click, with the clicker at the top of the pencil. It has no padding near the end of the pencil which interferes with the pencil holder. Likewise, pencils with side clickers don’t work well with the pencil holder.
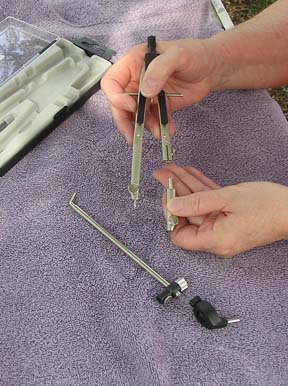
The photo on the left shows the compass with the extender bar, and pencil holder. When using a compass, it is important to spin the compass with the little spinning knob that is on top. Notice that there are two black tabs on the front of the compass. These are quick release tabs that enable you to expand or contract the compass quickly. In the center of the compass is a small dial. This is for fine-tuning the diameter of your circle.
Now, let’s look at the assembly of the parts of this compass. The compass is held together with very tiny screws and nuts. Be careful when loosening the ends of these to never remove them entirely. If this happens, it is really easy to lose one of the tiny parts. It is never necessary to entirely remove a screw from the compass.
In this photo you see the basic compass (held in the hands), the extender bar and the pencil holder. Begin by loosening the screw that holds the pencil point of the compass. Again, be careful not to remove the bolt that holds the screw in place; just loosen it. Remove the pencil point. It may be tight, and you may need to pull hard, especially when the compass is new.
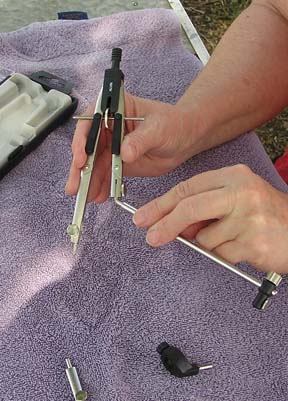
Pick up the extender bar and insert it into the end that held the pencil point. I generally open the compass as wide as possible when inserting the extender. It can be very stiff when the compass is new. You will feel it snap into place.
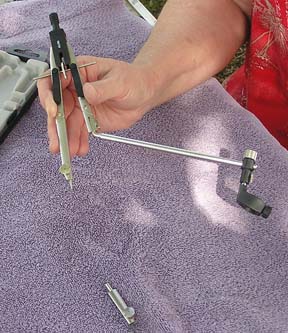
Insert the pencil holder into the end of the extender bar. This also might be tight when the compass is new. The black attachment at the end of the extender is meant to slide up and down the extender for increased flexibility when drawing circles. Be careful to NEVER unscrew the top of this. It is very difficult to put back together.

Insert your mechanical pencil into the pencil holder and you are ready to draft! Note that the black sliding attachment must be used at the end of the extender bar IF you are using a pencil in the pencil holder. If you want to use the slider, insert the end that holds the lead that came with the compass.
I hope that these photos help those of you who purchase a compass, and then can’t remember how to assemble it when you try to use it 6 months or a year after class!
Purchase the compass and other useful quilting tools in my online store.
Cheers!
Gail